
Can An Existing Garage Door Be Insulated?
In the realm of home improvement and energy efficiency, the garage often remains an overlooked space. Yet, for many households, the garage serves not only as a storage area for vehicles and tools but also as a crucial buffer zone between the outdoor elements and the interior of the home. Insulating the garage, particularly its largest entry point— the garage door—can significantly impact the comfort, energy efficiency, and even the value of your home.
Why Insulating Your Garage Door Matters
The garage door is more than just a barrier between your home and the outside world; it plays a pivotal role in regulating temperature and protecting your belongings. However, many homeowners may overlook the
importance of insulating this vital component of their property. Here's why insulating your garage door matters:
Energy Efficiency:
An uninsulated garage door can act as a gateway for heat transfer, allowing cold air to infiltrate during winter and hot air to seep in during summer. By insulating your garage door, you create a barrier that helps maintain a more stable indoor temperature, reducing the workload on your heating and cooling systems and potentially lowering your energy bills.
Temperature Regulation: If your garage is attached to your home, uninsulated garage doors can
contribute to temperature fluctuations within the living spaces, making it harder to maintain a comfortable environment. Insulation helps to moderate temperatures, ensuring that your garage—and by extension, your home—remains cooler in summer and warmer in winter.
Protection of Belongings: Many homeowners use the garage not only for parking vehicles but also for storing valuable items such as tools, equipment, and seasonal decorations. Insulating your garage door can help protect these belongings from extreme temperatures, moisture, and humidity, preserving their condition and extending their lifespan.
Noise Reduction:
Insulated garage doors can help dampen external noises, making your home quieter and more peaceful. This can be particularly beneficial if you use your garage as a workspace or recreational area, allowing you to focus on tasks or enjoy leisure activities without disturbances from outside.
Increased Home Value: A well-insulated garage with an insulated door can be an attractive selling point for potential buyers, enhancing the overall value and marketability of your home. Prospective homeowners often prioritize energy-efficient features, and a properly insulated garage door can set your property apart from others on the market.
Insights into insulation
Garage door insulation refers to the process of adding a layer of material to the inside of your garage door to improve thermal efficiency and overall performance. This insulation serves as a barrier against heat transfer, helping to regulate temperatures inside the garage and minimize energy loss.
There are various types of insulation materials that can be used for garage doors, including foam board, reflective foil, and fiberglass batts. Each material has its own set of advantages and considerations, such as cost, effectiveness, and ease of installation.
The insulation is typically installed between the panels or within the framework of the garage door, depending on the design and construction of the door itself. Properly insulating your garage door can help maintain a more comfortable temperature inside the garage, reduce energy consumption, and enhance the durability of the door.
Methods of Insulation
When it comes to insulating your garage door, you have two main options: doing it yourself (DIY) or hiring a professional installer. Each approach has its own pros and cons, depending on your budget, time, and skill level.
DIY Installation:
Pros:
- DIY insulation projects are often cheaper since you won't have to pay for labor costs.
- You can work at your own pace and choose the materials and methods that best suit your needs.
- DIY projects can be educational and empowering, allowing you to gain new skills and knowledge.
Cons:
- Insulating a garage door can be time-consuming and physically demanding, especially if you're tackling the project alone.
- Depending on the complexity of the insulation method, DIY installation may require some level of skill and experience.
- Without professional expertise, there's a risk of mistakes or improper installation that could affect the effectiveness of the insulation.
Professional Installation:
Pros:
- Professional installers have the skills, experience, and tools needed to ensure proper installation and optimal performance.
- Hiring professionals can save you time and effort, allowing you to focus on other priorities.
- Many professional installation services offer warranties or guarantees on their workmanship and materials.
Cons:
- Professional installation typically comes with a higher price tag due to labor and overhead expenses.
- You'll need to coordinate with the installer's schedule, which may not always align with your availability.
- With professional installation, you have less control over the specific materials and methods used, as well as the timeline of the project.
Ultimately, the choice between
DIY and professional installation depends on your individual preferences, budget, and comfort level with home improvement projects. If you're confident in your abilities and looking to save money, DIY insulation may be the way to go. However, if you prefer the assurance of professional expertise and convenience, hiring a professional installer might be worth the investment.
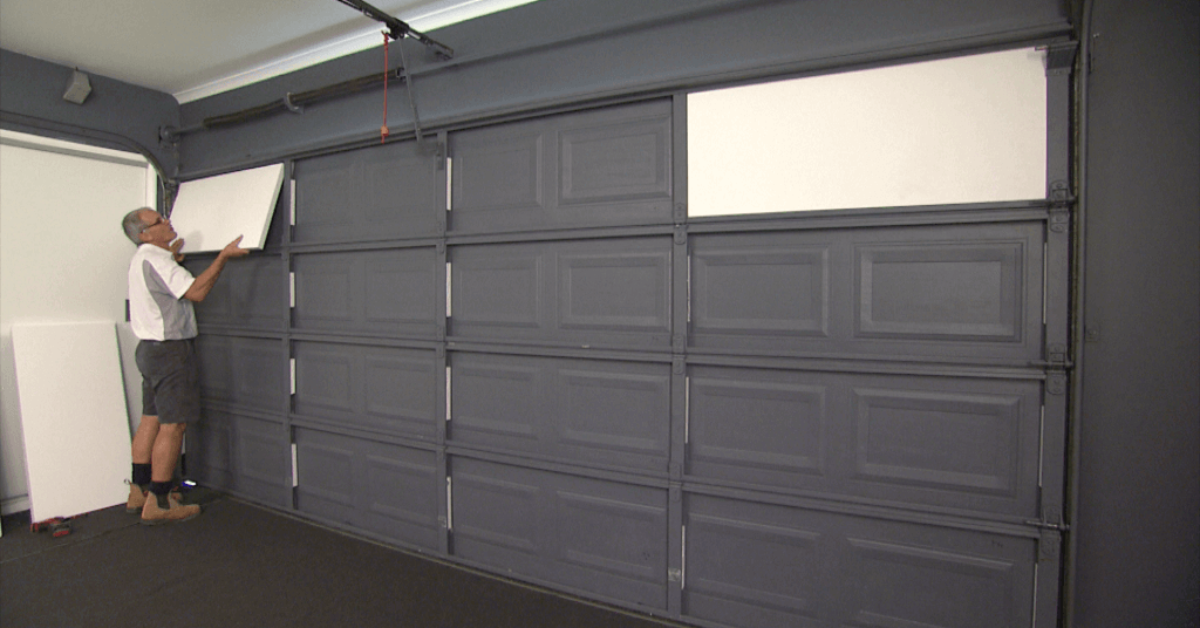
Steps to Insulate Your Garage Door
Before you begin insulating your garage door, gather the following tools and materials:
Insulation Material:Choose the type of insulation that best suits your needs and budget, such as foam board, reflective foil, or fiberglass batts.
Tape Measure:For taking accurate measurements of your garage door panels.
Utility Knife:For cutting insulation panels to size.
Straightedge:For guiding your cuts and ensuring straight edges.
Adhesive or Fasteners:Depending on the insulation material, you may need adhesive, tape, or mechanical fasteners to secure the insulation to the door.
Safety Gear: Wear gloves, safety glasses, and a dust mask to protect yourself during the installation process.
Step-by-Step Guide to Insulation
Follow these steps to insulate your garage door:
- Use a tape measure to determine the dimensions of each garage door panel, including any recessed areas or irregularities.
- Using a utility knife and straightedge, cut the insulation material to fit each panel, leaving a slight gap around the edges for expansion.
- Depending on the insulation type, apply adhesive to the back of the insulation panels or use mechanical fasteners to secure them to the garage door.
- Use weather-stripping or caulk to seal any gaps or seams between the insulation panels and the door frame, ensuring a tight seal.
- Once the insulation is installed, test the operation of your garage door to ensure that it opens and closes smoothly without any obstruction.
- Keep an eye on the temperature and humidity levels inside your garage after insulation installation to assess its effectiveness. Make adjustments as needed to optimize comfort and energy efficiency.
By following these steps and taking the necessary precautions, you can successfully insulate your garage door and enjoy the benefits of improved energy efficiency, comfort, and protection for your belongings. Whether you choose to tackle the project yourself or enlist the help of a professional, proper insulation can make a significant difference in the performance and livability of your garage space.
Considerations and Tips
When considering insulation for your garage door, it's important to factor in the prevailing weather conditions of your area. In colder climates, insulation becomes crucial for retaining heat and preventing energy loss during winter months. Materials with high thermal resistance are preferred to combat the cold effectively. Conversely, in warmer climates, insulation helps maintain a cooler environment by reducing heat gain from outside. Reflective foil insulation is particularly effective in hot climates. Regardless of climate, prioritize moisture resistance, durability, and ease of installation when selecting insulation materials.
Safety should be a top priority during the installation of garage door insulation. Wear appropriate personal protective equipment such as gloves, safety glasses, and a dust mask to protect against potential hazards like sharp edges and airborne particles. Exercise caution when handling tools such as utility knives and power tools to avoid accidental injuries. Ensure proper ventilation in the workspace when working with insulation materials that emit fumes or dust particles. Take breaks as needed to prevent overexertion and heat-related illnesses, especially in hot or humid conditions. By prioritizing safety precautions, you can complete the installation process safely and effectively.
Conclusion
Insulating your garage door is a practical investment that offers numerous benefits, including improved energy efficiency, enhanced comfort, protection of belongings, noise reduction, and increased home value. By considering factors such as weather conditions and safety precautions during installation, you can successfully complete the project and enjoy a more comfortable and efficient garage space. Whether you choose to tackle the insulation yourself or enlist professional help, the rewards of a well-insulated garage door are well worth the effort.
You might also like
Fix N Go Blog


