
Garage Door Paint and Finish: Repair and Refinishing Tips
Your garage door plays a vital role in your home's overall appearance and security. It's more than just an entry point; it's a sentinel guarding your belongings and contributing to your property's charm. However, over time, exposure to the elements can leave your garage door's paint and finish weathered, worn, and in dire need of attention. Here, you will learn how to restore its beauty and strengthen its defenses against the elements. Discover how a fresh coat of paint and a pristine finish can rejuvenate your home's aesthetic appeal while safeguarding this essential gateway to your world. Follow us as we repair and improve your garage door to the point where its aesthetics match its practicality.
Assessing the Current Condition
When you're about to embark on the journey of reviving your garage door's appearance and protection, the first step is to carefully evaluate its current condition. Begin by taking a close look at the paint on your garage door. Check for any areas where the paint has chipped, cracked, or peeled. These are signs that the paint is deteriorating and needs attention.
Next, consider whether the color of the paint has faded over time. Fading can make your garage door look dull and less appealing, and it's a common issue due to prolonged exposure to sunlight. If your garage door is made of metal, be on the lookout for rust. Rust typically appears as reddish-brown spots or patches on the surface. It not only affects the door's appearance but also weakens the metal, which can lead to more significant problems if not addressed promptly.
Dents and physical damage should also be assessed. Even minor dents can impact both the look and functionality of your garage door. For wooden garage doors, be sure to check for wood rot, cracks, or splitting, as wood can be susceptible to weather-related damage. Lastly, examine the finish of the garage door for signs of peeling, cracking, or a loss of its shine.
By carefully inspecting these aspects, you'll gain a clear picture of your garage door's condition, enabling you to take the necessary steps to address common issues like peeling, fading, and rust, and ultimately, restore your garage door's appearance and protection.
Gather the Necessary Tools and Materials
Gathering the required tools and materials is a must before beginning the task of repairing and refinishing your garage door. Here's a list of what you'll need:
Sandpaper: Various grits of sandpaper are crucial for smoothing the surface and removing old paint or finish.
Primer: A high-quality primer is essential for ensuring proper adhesion of the new paint and finish.
Paint: Choose a paint that's suitable for your garage door's material and the climate in your area. Ensure it complements your desired color and finish.
Brushes: Quality brushes will help you achieve a smooth and even paint application. Consider different brush sizes for different areas of the door.
Safety Gear: Safety should always come first. Don't forget items like safety glasses, gloves, and a dust mask to protect yourself during the refinishing process.
Painter's Tape: This is handy for masking off areas you don't want to paint, such as windows or hardware.
Drop Cloths or Tarps: Covering the area around your garage door will prevent paint and debris from making a mess.
Paint Tray and Roller: A roller can help you cover larger areas more quickly and evenly.
Putty or Filler: If your door has any dents or imperfections, putty or filler can help smooth them out.
Screwdriver or Wrench: You may need these tools to remove hardware or components before refinishing.
Cleaning Supplies: Cleaning the door thoroughly before starting is crucial. You can use a scrub brush, soap, and a bucket.
Rags or Tack Cloth: Use these for wiping down the surface and removing dust and debris.
Ladder: Depending on your garage door's height, you may need a ladder to reach all areas comfortably and safely.
Having these tools and materials ready and organized before you begin your garage door repair and refinishing project will ensure a smoother and more successful process.
Preparing for the Project
It is important to stress safety precautions and proper preparation before diving headfirst into the task of fixing and refinishing your garage door. This groundwork not only ensures your safety but also contributes to the success of the project.
Equip yourself with essential safety gear, including safety glasses, gloves, and a dust mask, to shield against potential hazards like dust, paint fumes, and debris. Depending on the size and height of your garage door, you may need a ladder for access. Ensure it's stable, positioned on a level surface, and never overreach or stand on the top rungs.
Be mindful of chemicals present in materials like paint and primer used for refinishing. Proper ventilation and the use of safety gear are essential to protect yourself from inhaling harmful fumes. When handling tools such as sandpaper and brushes, exercise caution by following the manufacturer's instructions to prevent accidents.
Now, let's discuss preparing the garage door surface:
Begin by removing any loose or peeling paint using a scraper or wire brush, as loose paint can affect the adhesion of the new coat. If rust is present, use sandpaper or a wire brush to eliminate it down to the bare metal to prevent its return. Clean the entire garage door surface thoroughly with soap and water, a specialized cleaner, or a pressure washer to remove dirt, grease, or grime. Rinse and allow the surface to dry completely.
If dents or imperfections were identified during your inspection, consider using putty or filler to smooth them out. Sand the filled areas until they're flush with the surrounding surface. Properly preparing the garage door surface not only enhances the adhesion of the new paint and finish but also ensures a cleaner and more appealing final result, contributing to the success and durability of your garage door repair and refinishing project.
Repairing and Sanding
To achieve a polished and protective finish for your garage door, you must focus on two essential steps: addressing damage and achieving a smooth surface through careful sanding. Start by ensuring a clean and organized work area and gather the necessary materials for repairs. Apply putty or filler to damaged areas, allowing it to dry completely, and then meticulously sand it until it's smooth. When it comes to sanding, gather your tools and begin with coarse-grit sandpaper to effectively remove any old paint, imperfections, or rough spots. Progress to medium-grit for further smoothing and finish with fine-grit sandpaper for a polished surface that's ready to receive a new finish. Once the sanding is complete, take the time to thoroughly clean the door, removing any residual sanding dust. These meticulous steps lay the foundation for a professional and long-lasting finish that enhances both aesthetics and durability.
Choosing the Right Paint and Finish
When choosing the right paint and finish for your garage door, several critical factors come into play. First, consider your garage door's material, as different materials require specific paint and finish types. Next, think about your local climate and weather conditions, as these can impact the paint's durability and resilience. There are various paint types available, such as latex, oil-based, and enamel, each with its unique properties. The finish you opt for, whether matte or high-gloss, affects both appearance and maintenance. The paint you choose for your home should complement its current style. Also, prioritize quality, as investing in high-quality products ensures better adhesion, less fading, and reduced long-term maintenance. By carefully considering these factors, you'll make an informed choice that enhances both the aesthetic appeal and protection of your garage door.
Applying Primer
Applying primer before painting is important as it serves as a preparatory layer that enhances adhesion, promotes even color, and improves paint durability. To apply primer evenly, start by ensuring a clean and dry surface, then use a brush or roller to spread a thin, uniform coat of primer over the entire garage door, working in the direction of the door panels. Allow it to dry as per the primer manufacturer's recommendations before moving on to the final paint application. Proper primer application creates a stable foundation for the paint, ensuring a more lasting and professional finish.
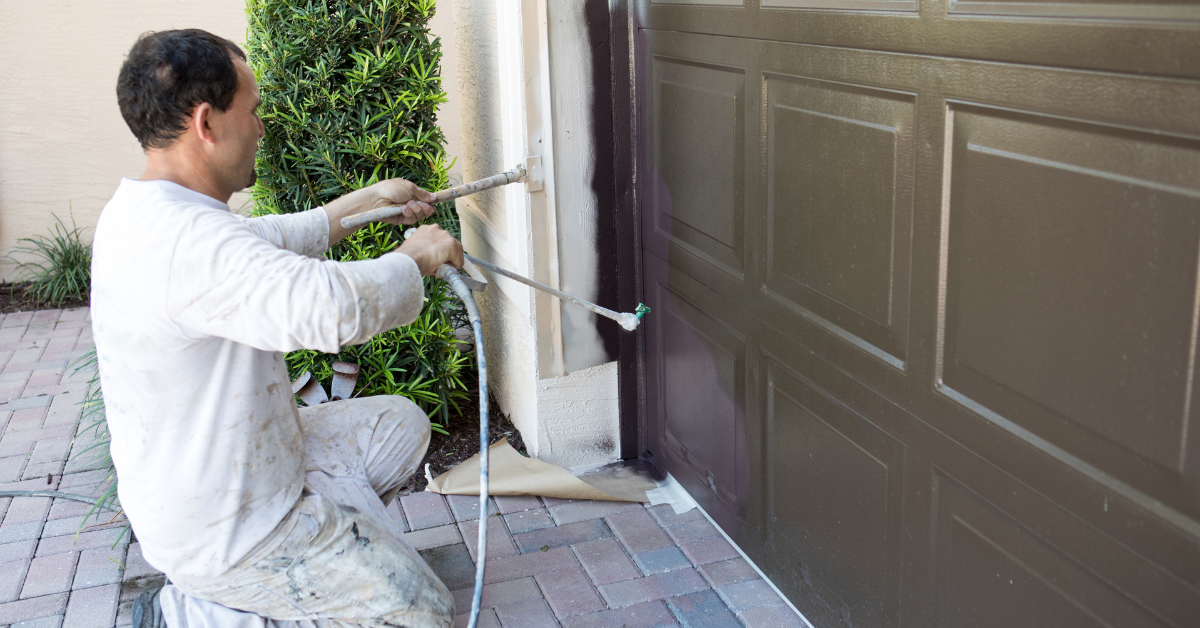
Painting the Garage Door
Garage door painting requires careful surface preparation, including the removal of dirt and loose paint. Apply painter's tape diligently to protect areas you don't want to paint, such as windows or hardware. Use long, even strokes in the direction of the door panels, starting at the top and working your way down. This technique ensures a polished, professional finish. When applying the chosen paint type and finish, take care not to overload the brush or roller to prevent unsightly drips or streaks. Be sure to follow the paint manufacturer's guidelines for drying times, allowing each coat to dry completely before applying additional layers for the best results.
Applying Finish Coat
Applying the final finish coat is the concluding step in the garage door refinishing process. It involves carefully spreading a uniform layer of finish over the painted surface. This finish coat plays a vital role in protecting the underlying paint from the elements, enhancing its durability and resilience over time. It also adds a polished sheen, contributing to the door's overall appearance. When applying the finish coat, ensure the surface is clean and dry, use even strokes, and follow the manufacturer's recommendations for drying times to achieve the desired level of protection and aesthetics.
Caring for Your Refinished Garage Door
To maintain the longevity of your garage door's newly refreshed finish, it's essential to perform regular visual inspections, ideally every few months, to check for any signs of wear or damage, such as chipped paint, cracks, or rust. You can also make cleaning the door a part of your routine—simply use mild soap and water to remove accumulated dirt and grime. Should you spot any minor blemishes or areas where the finish has worn down, it's advisable to address these promptly with touch-ups. This proactive approach will prevent these small issues from evolving into more significant concerns, helping your garage door maintain its pristine appearance and protective capabilities over the long term.
Safety Tips
Safety is paramount throughout your project. Always wear protective gear, including safety glasses, gloves, and a dust mask to safeguard against potential hazards like dust and fumes. Ensure proper ventilation in your workspace, especially when working with paints or finishes. Use ladders with caution, maintaining stability and avoiding overreaching. Keep your work area clean and organized to reduce tripping hazards, and dispose of materials in accordance with local regulations. These precautions will help ensure a safe and successful garage door repair and refinishing project.
Conclusion
Garage door repair and refinishing are essential not only for enhancing the aesthetic appeal of your home but also for prolonging the lifespan of your garage door. By following a systematic approach that includes assessing the current condition, proper preparation, choosing the right materials, and applying finishes carefully, you can revitalize your garage door's appearance and ensure it stands up to the test of time and the elements. Regular maintenance and safety precautions play vital roles in maintaining the longevity of your garage door's new finish. So, don't wait—take action today to transform your garage door into a striking and long-lasting asset for your home. Your efforts will not only boost curb appeal but also protect your investment for years to come.
You might also like
Fix N Go Blog


