
How to Identify and Fix Garage Door Cable Tension Issues
The garage door, a pivotal element of our homes, operates seamlessly when all its components work in harmony. Among these components, the garage door cables play a crucial role in facilitating smooth movement and ensuring structural integrity. Understanding the importance of garage door cable tension is paramount for homeowners seeking to maintain the functionality and safety of their garage doors. Proper tension ensures balanced movement, preventing undue stress on other components and mitigating the risk of malfunctions.
Despite their robust design, garage door cables can encounter various tension-related issues over time. This section provides an insightful overview of the common tension issues that homeowners may face. From uneven door movement to sagging or slack cables, these issues can not only disrupt the smooth operation of the garage door but also pose safety concerns. By gaining a comprehensive understanding of these common tension-related challenges, homeowners can embark on a proactive journey to identify, troubleshoot, and resolve cable tension issues effectively. This guide aims to empower readers with the knowledge and techniques needed to maintain optimal garage door cable tension and preserve the longevity of their garage door systems.
Signs of Cable Tension Problems
Uneven Movement of the Garage Door
One of the telltale signs indicating potential cable tension issues is the occurrence of uneven movement in the garage door. If the door exhibits a noticeable tilt or struggles to open and close smoothly, it may be an indication that the cables are not evenly tensioned. Uneven movement not only compromises the aesthetic appeal of the garage door but also points to an underlying mechanical imbalance. Recognizing this symptom prompts homeowners to investigate further and address cable tension problems promptly to prevent additional wear on other components.
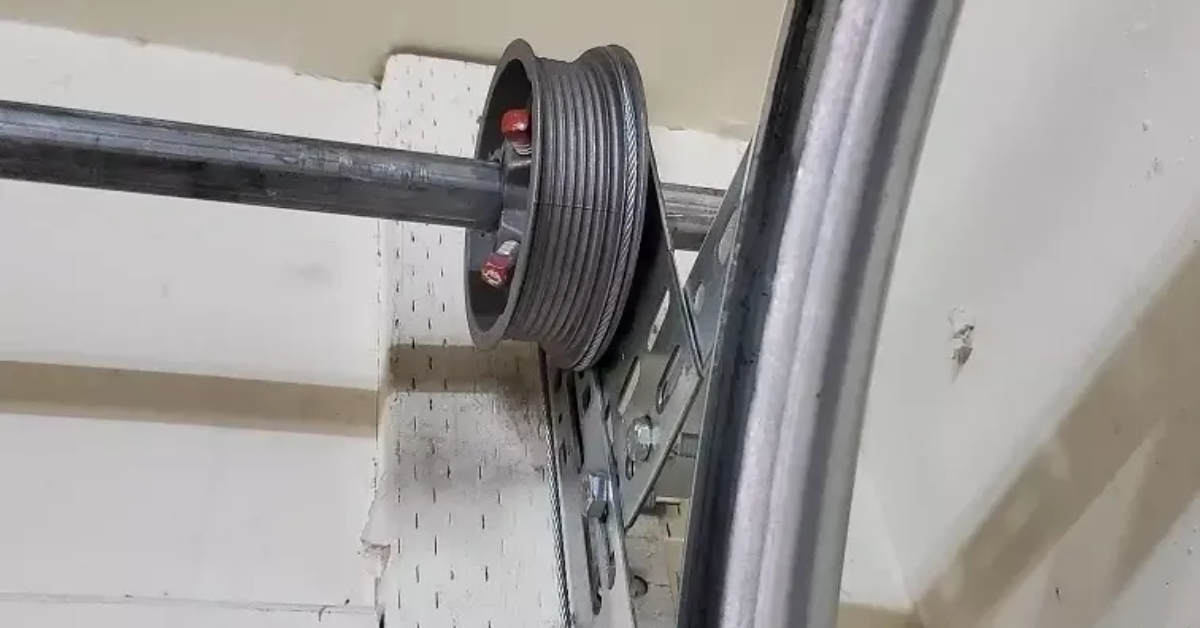
Sagging or Slack Cables
Sagging or slack cables are clear indicators of tension problems in a garage door system. When cables lose their proper tension, they may appear visibly slack or exhibit sagging between the drum and pulley. This not only compromises the overall stability of the garage door but also poses safety risks. Slack cables can impede the smooth operation of the door, potentially leading to misalignment or jams. Identifying and rectifying sagging or slack cables is crucial to maintaining the integrity of the garage door system and ensuring the safety of both property and occupants.
Unusual Sounds During Operation
Unusual sounds emanating from the garage door during operation can be indicative of cable tension issues. If the cables are not adequately tensioned, the garage door may produce grinding, scraping, or popping noises as it moves along the tracks. These sounds often signify friction, misalignment, or excessive strain on the components. Homeowners should pay close attention to any unexpected noises during garage door operation, as addressing cable tension problems promptly can prevent further damage and extend the overall lifespan of the garage door system. Regularly listening for and identifying these audible cues is a proactive measure in maintaining optimal cable tension and ensuring the garage door's smooth and quiet operation.
Identifying the Root Causes
Misaligned or Off-Track Cables
Misaligned or off-track cables are frequent culprits behind garage door tension issues. When cables deviate from their designated path, the garage door's movement becomes compromised, resulting in uneven tension. Misalignment often occurs due to loose brackets, damaged rollers, or obstructions along the track. Identifying and rectifying misaligned or off-track cables is essential in restoring proper tension and preventing further damage to the garage door system. Regular inspections to ensure cables run smoothly within the tracks contribute to a more reliable and durable garage door operation.
Worn or Damaged Cables
Worn or damaged cables significantly impact the tension and functionality of a garage door. Over time, cables can fray, corrode, or suffer from general wear, diminishing their tensile strength. Visual inspections can reveal signs of wear, such as frayed strands or visible damage. Identifying worn or damaged cables is crucial for maintaining optimal tension and preventing potential safety hazards. Prompt replacement of worn cables is essential to uphold the structural integrity of the garage door system and ensure its continued smooth operation.
Issues with Cable Drum or Pulley
The cable drum and pulley system plays a pivotal role in regulating tension during the garage door's movement. Issues with these components, such as rust, misalignment, or wear, can disrupt the cable's smooth operation, leading to tension problems. Visual inspection of the cable drum and pulley, including checking for any signs of damage or misalignment, is essential for identifying root causes of tension issues. Addressing problems with the cable drum and pulley system not only restores proper tension but also prevents further complications, contributing to the overall longevity and reliability of the garage door. Regular maintenance and timely repairs of these components are key to a well-functioning garage door system.
DIY Inspection and Assessment
Conducting a visual inspection of cable alignment is a fundamental step in identifying and addressing tension issues. Carefully examine the cables to ensure they run smoothly along the tracks without any deviations or misalignments. Check for any visible obstacles, such as debris or bent tracks, which may impede the cables' proper movement. A thorough visual assessment provides valuable insights into the current state of cable alignment and helps in pinpointing potential issues that may be affecting tension.
The condition of the cables is paramount to maintaining optimal tension. Perform a meticulous check for signs of wear, fraying, or damage along the entire length of the cables. Pay attention to any visible rust, corrosion, or distortion. Identifying early signs of wear allows for timely intervention, preventing potential cable failures and ensuring the sustained reliability of the garage door system. Regular inspections and prompt replacement of worn cables contribute to the overall longevity of the garage door.
The functionality of the cable drum and pulley system directly influences cable tension. Evaluate these components for any signs of wear, misalignment, or damage. Ensure that the drum rotates smoothly, without wobbling or resistance, and that the pulley is securely attached. Addressing issues with the drum and pulley system is integral to restoring proper tension and preventing future complications. A systematic evaluation of these components during a DIY inspection enhances the effectiveness of subsequent adjustments, contributing to the overall efficiency and longevity of the garage door system.
Adjusting and Restoring Cable Tension
Once the inspection phase is complete, adjusting and restoring cable tension becomes the next crucial step. Familiarize yourself with proper techniques for cable adjustment, ensuring that adjustments are made incrementally and evenly on both sides. Use the appropriate tools and follow manufacturer guidelines to achieve the desired tension level. Precision in cable adjustment is essential to prevent uneven movement, premature wear, and potential safety hazards.
Ensuring Even Tension on Both Sides
Maintaining even tension on both sides of the garage door is imperative for balanced and smooth operation. Utilize a level to confirm that the door hangs uniformly, and the cables are under equal tension. Any discrepancies in tension may lead to performance issues, including misalignment or strain on the garage door components. By meticulously ensuring even tension on both sides, DIY enthusiasts contribute to the overall stability and longevity of the garage door system.
Lubrication for Optimal Performance
Lubrication is a key aspect of cable tension maintenance. Apply a high-quality garage door lubricant to the cables, pulleys, and other moving parts to reduce friction and enhance performance. Adequate lubrication minimizes wear and tear, promotes smooth movement, and prevents corrosion. Regularly incorporating lubrication into the DIY maintenance routine is a proactive measure that supports optimal cable tension and contributes to the overall efficiency of the garage door system.
Common Mistakes to Avoid
Over-tightening Cables: A prevalent mistake in DIY garage door maintenance is the over-tightening of cables. While proper tension is crucial, excessive force can lead to detrimental consequences. Over-tightened cables may cause misalignment, strain on the door's components, and increased wear. DIY enthusiasts should adhere to manufacturer guidelines and recommended tension levels to avoid this common pitfall. Striking the right balance in cable tension ensures optimal functionality and safeguards against unnecessary stress on the garage door system.
Neglecting Regular Cable Maintenance:
Neglecting regular cable maintenance is a mistake that can compromise the overall health of a garage door system. Cables, being integral components, require periodic inspections, lubrication, and adjustments. Failure to conduct routine maintenance increases the risk of wear, corrosion, and unexpected failures. By overlooking these essential tasks, homeowners may unwittingly contribute to premature wear and compromise the safety and longevity of their garage door system.
Ignoring Professional Help When Needed:
Another critical mistake is dismissing the need for professional assistance when faced with complex garage door cable issues. While DIY efforts are commendable for routine maintenance, certain problems demand the expertise of qualified professionals. Ignoring signs that professional help is necessary, such as intricate cable adjustments or extensive repairs, can exacerbate issues and lead to costly consequences. Recognizing the limitations of DIY skills and seeking timely professional assistance is essential for ensuring the effective and safe operation of the garage door system.
Professional Assistance
Knowing when to seek professional service is crucial for homeowners navigating garage door challenges. If DIY efforts prove insufficient, or if issues persist despite interventions, it's time to consider professional assistance. Signs such as persistent misalignment, recurring tension problems, or unusual sounds during operation indicate the need for expert evaluation. Recognizing these signals and promptly reaching out to professionals can prevent further complications and ensure the efficient functioning of the garage door.
Fix N’ Go Garage Door Repair and Installation
Fix N’ Go Garage Door Repair and Installation stands out for its commitment to excellence. Known for their expertise, reliability, and customer satisfaction, this service provider showcases the qualities homeowners should seek in a garage door repair expert. By considering reputable professionals like Fix N’ Go, homeowners can confidently entrust their garage door maintenance and repairs to qualified hands, ensuring the longevity and optimal performance of their valuable investment.
Conclusion
Mastering the art of garage door cable tension identification and fixes is fundamental for homeowners seeking a well-functioning and durable garage door system. This guide has underscored the importance of visual inspection, diligent cable maintenance, and timely adjustments to maintain optimal tension levels. As we recap the key steps in identifying cable tension issues and restoring equilibrium, it is essential to emphasize the significance of regular maintenance and vigilance. By incorporating routine inspections and promptly addressing any emerging issues, homeowners can proactively contribute to the longevity and smooth operation of their garage doors. In the dynamic interplay between DIY efforts and professional expertise, a commitment to ongoing maintenance becomes the cornerstone for a reliable, safe, and efficiently functioning garage door system.
You might also like
Fix N Go Blog


