
How To Install A Commercial Garage Door Opener?
Installing a commercial garage door opener is a crucial step in ensuring the smooth and efficient operation of your commercial garage or warehouse. Whether you're upgrading an existing opener or installing one for the first time, proper installation is essential for safety, security, and convenience. In this guide, we'll walk you through the process of installing a commercial garage door opener, from choosing the right opener for your needs to programming and testing its functionality. By following these steps and guidelines, you'll be able to install your commercial garage door opener with confidence and peace of mind.
Choosing the Right Commercial Garage Door Opener
Selecting the appropriate commercial garage door opener is a critical decision that impacts the functionality and security of your business premises. There are several factors to consider when making this choice.
Chain Drive Openers:
Chain drive openers are the most common type and are known for their affordability and durability. They use a metal chain to raise and lower the garage door.
Belt Drive Openers:
Belt drive openers operate similarly to chain drive models but use a rubber belt instead of a chain. They are quieter and smoother in operation, making them ideal for businesses where noise is a concern.
Screw Drive Openers:
Screw drive openers use a threaded steel rod to lift and lower the garage door. They require less maintenance than chain or belt drive openers but may not be suitable for extremely heavy doors.
What To Consider When Selecting An Opener
Door Size and Weight:
Consider the size and weight of your commercial garage door to ensure the opener can handle the load.
Noise Level: Evaluate the noise level of different opener types and choose one that aligns with the noise tolerance of your workspace.
Security Features:
Look for openers with advanced security features such as rolling code technology and encryption to protect against unauthorized access.
Durability and Warranty:
Opt for openers with robust construction and a reliable warranty to ensure long-term performance and peace of mind.
Gathering Necessary Tools and Materials
Before starting the installation process, it's essential to gather all the tools and materials you'll need to complete the job efficiently and safely.
Essential Tools for Installation
- Power Drill: For drilling holes and securing mounting brackets.
- Screwdriver Set: To tighten screws and fasten hardware.
- Adjustable Wrench: For adjusting nuts and bolts.
- Level: To ensure the opener is installed evenly and straight.
- Wire Strippers: For stripping and connecting electrical wires.
- Safety Glasses: To protect your eyes during installation.
Required Hardware and Components
- Garage Door Opener Kit: Includes the opener unit, rails, and necessary hardware.
- Mounting Brackets: To secure the opener to the ceiling or wall.
- Safety Sensors: Detects obstructions in the door's path and prevents accidents.
- Remote Controls: Allow for easy operation of the garage door from a distance.
- Keypad or Wall Control Panel: Provides additional control options for opening and closing the door.
By carefully considering your needs and preferences and gathering the necessary tools and materials, you'll be well-equipped to install your commercial garage door opener successfully.
Preparing the Garage Door
Before installing the garage door opener, it's essential to prepare the garage door to ensure smooth and trouble-free operation.
- Inspect the garage door for any signs of damage, such as dents, rust, or misalignment. Repair or replace any damaged components before proceeding with the installation.
- Apply lubricant to the hinges, rollers, and tracks to ensure smooth movement. Lubrication helps reduce friction and extends the lifespan of the door components.
- Tighten any loose screws, bolts, or nuts on the garage door tracks, hinges, and rollers. Secure hardware ensures the door operates safely and efficiently.
Ensuring Compatibility with the Opener
- Verify that the garage door is compatible with the weight and size specifications of the chosen opener. Ensure the door is balanced and operates smoothly without binding or sticking.
- Measure the clearance and headroom above the garage door to ensure there is sufficient space for installing the opener and its components. Make any necessary adjustments to accommodate the opener's dimensions.
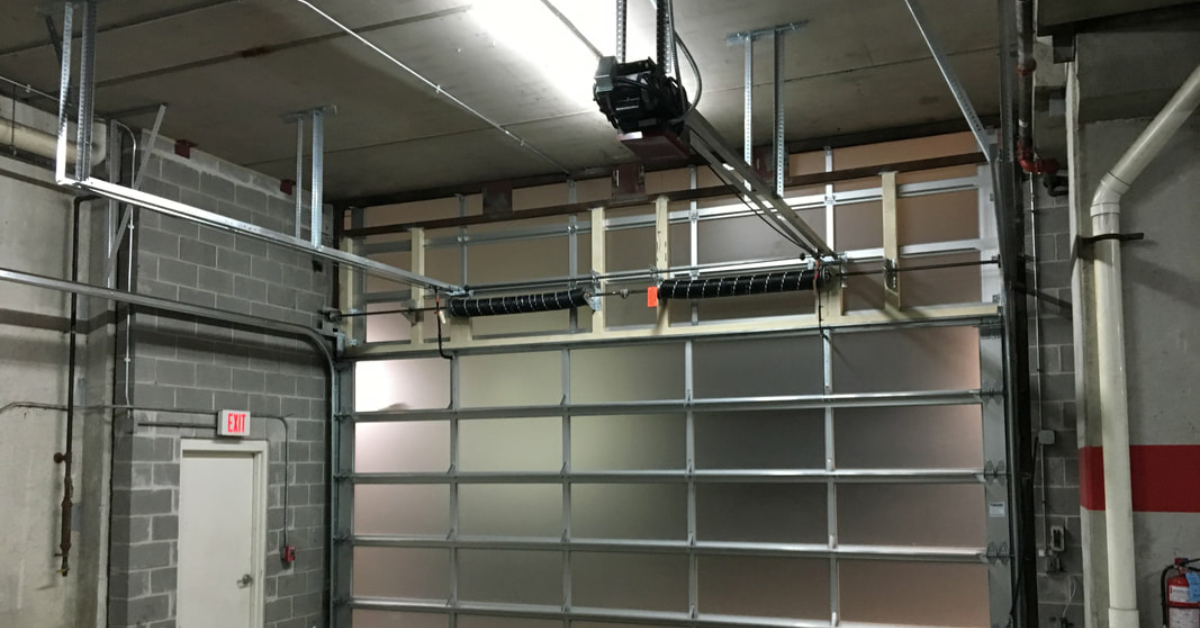
Installing the Garage Door Opener
With the garage door prepared, it's time to install the opener following these step-by-step instructions:
Mounting the Opener Rail and Motor Unit
- Attach the opener rail to the ceiling or wall above the garage door, ensuring it is level and securely fastened. Use mounting brackets provided with the opener kit for proper installation.
- Secure the motor unit to the ceiling or wall near the center of the garage, ensuring it is aligned with the opener rail. Use sturdy mounting hardware to support the weight of the motor unit.
Attaching the Trolley and Drive Mechanism
- Attach the trolley to the opener rail and connect it to the drive mechanism. Ensure the trolley moves freely along the rail without any obstructions.
- Securely fasten the drive mechanism to the garage door, ensuring proper alignment and tension. Follow the manufacturer's instructions for attaching the drive mechanism to the door.
Connecting the Opener to Power Sources
- Connect the electrical wires from the opener motor unit to the power source, following local building codes and safety regulations. Use wire connectors to secure the connections and prevent electrical hazards.
- Test the opener to ensure it operates smoothly and without any issues. Activate the opener using the wall control panel or remote control and observe the door's movement. Adjust settings or make necessary adjustments as needed.
By following these steps and guidelines, you can successfully prepare the garage door and install the opener, ensuring reliable and efficient operation for years to come.
Setting Up Safety Features
Ensuring the safety of your garage door system is paramount. Here's how to set up essential safety features:
Installing Safety Sensors and Reversing Mechanisms
- Install safety sensors near the bottom of the garage door tracks, facing each other. These sensors detect obstacles in the door's path and prevent closing if an obstruction is detected.
- Connect the safety sensor wires to the opener motor unit according to the manufacturer's instructions. Ensure proper alignment and secure mounting to maintain functionality.
- Verify that the garage door opener's reversing mechanism is functioning correctly by placing an obstruction in the door's path during closing. The door should reverse immediately upon contact with the obstacle.
Testing and Adjusting Safety Settings
- Check the alignment of the safety sensors by ensuring the indicator lights are illuminated and aligned properly. Adjust the sensors if necessary to maintain alignment and functionality.
- Perform a test of the garage door opener's reversal function by placing a sturdy object, such as a block of wood, in the door's path during closing. The door should reverse within seconds of contact with the object.
Programming and Testing the Opener
After installing safety features, it's time to program and test the functionality of the garage door opener:
Programming Remote Controls and Keypads
- Follow the manufacturer's instructions to program remote controls and keypads to operate the garage door opener. This typically involves entering a specific code or pressing a sequence of buttons.
- Test each programmed remote control and keypad to ensure they effectively open and close the garage door. Verify that the opener responds promptly and operates smoothly with each input.
Testing the Opener for Proper Functionality
- Conduct a full cycle test of the garage door opener by opening and closing the door several times using different control methods, including remote controls, keypads, and the wall control panel.
- Observe the door's movement and listen for any unusual sounds or delays during operation. Address any issues promptly to ensure optimal functionality and safety.
Conclusion
Installing a commercial garage door opener requires careful preparation, precise execution, and thorough testing of safety features and functionality. By following the step-by-step instructions outlined in this guide and adhering to safety guidelines, you can successfully install a commercial garage door opener to enhance security, convenience, and efficiency in your business premises.
You might also like
Fix N Go Blog


