How To Program Craftsman Garage Door Opener?

Rabia Tingat • August 26, 2024

Programming your Craftsman garage door opener is a task that can be accomplished with a few simple steps, ensuring your garage door functions smoothly and securely. If you need to reprogram it after changing remotes or adding a new keypad or setting it up for the first time, this guide will walk you through the steps. By following these instructions, you'll be able to program your Craftsman garage door opener with ease.


Why Programming Your Craftsman Garage Door Opener Is Important


Programming your garage door opener is essential for ensuring that only authorized remotes and keypads can access your garage. This not only enhances security but also ensures the opener operates correctly. Proper programming also allows you to sync multiple devices, such as remotes and wall consoles, to your garage door opener for convenient access.


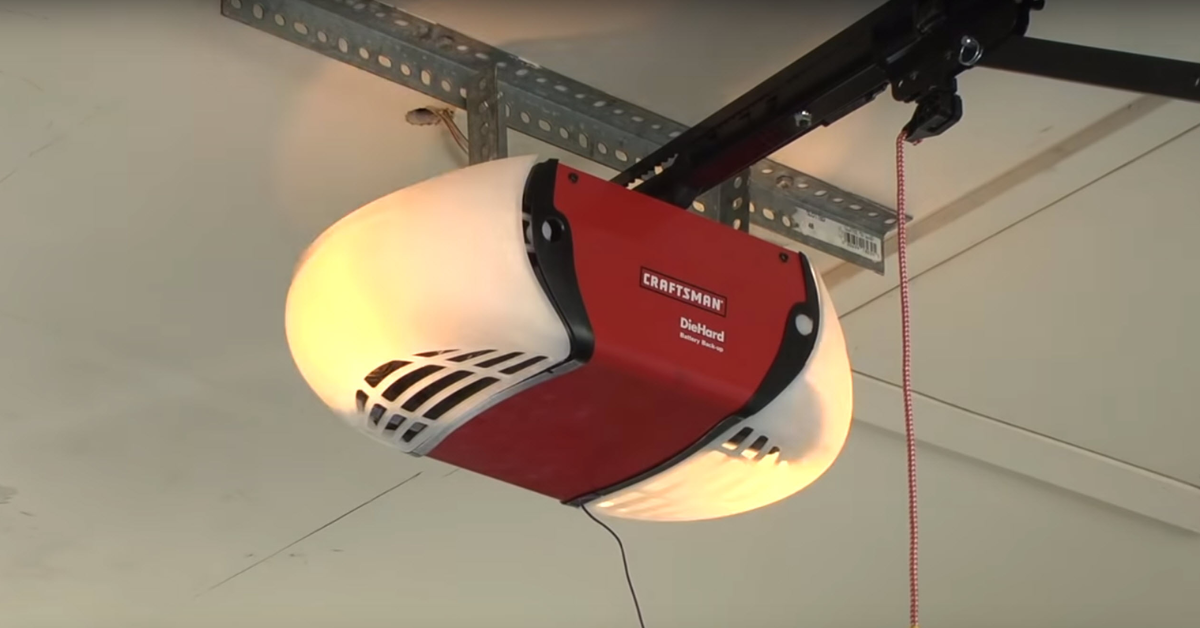
Understanding Your Craftsman Garage Door Opener


Before diving into the programming process, it’s important to familiarize yourself with the components of your Craftsman garage door opener. These typically include:

  • The Motor Unit: Located on the ceiling of your garage, this is the main component that powers the opener.
  • Remote Controls: Handheld devices that allow you to open and close the garage door from a distance.
  • Wall Console: A mounted unit inside the garage that controls the opener.
  • Keypad: A wireless unit outside the garage that allows entry using a code.


Step-by-Step Guide to Programming a Craftsman Garage Door Opener


The programming process for a Craftsman garage door opener may vary slightly depending on the model. However, the following steps provide a general guide that should work for most Craftsman openers.


Step 1: Locate the “Learn” Button


The first step in programming your Craftsman garage door opener is to locate the “Learn” button on the motor unit. The “Learn” button is usually found on the back or side of the motor unit, near the antenna wire. It may be under a light cover or behind a panel. The button is typically yellow, green, red, or purple, depending on the model.

Note: The color of the “Learn” button may affect the specific steps for programming, so be sure to consult your owner’s manual if necessary.


Step 2: Clear the Opener’s Memory (Optional)


If you’re reprogramming your opener or adding new remotes, it may be helpful to clear the opener’s memory to remove any previous codes. This step is optional but recommended for security reasons.

To clear the memory:

  1. Press and hold the “Learn” button until the indicator light turns off (approximately 6-10 seconds).
  2. Release the button. The opener’s memory is now cleared, and previous remotes or keypads will no longer work.


Step 3: Program the Remote Control


Once you’ve located the “Learn” button and optionally cleared the memory, you can proceed to program the remote control.

  1. Press and release the “Learn” button on the motor unit. The indicator light will turn on and stay on for 30 seconds.
  2. Within 30 seconds, press and hold the button on your remote control that you wish to program.
  3. Hold the remote button until the motor unit’s light blinks or you hear a click. This indicates that the remote has been successfully programmed.
  4. Release the remote button.

Your remote control should now be programmed and ready to operate the garage door.


Step 4: Program the Keypad


If your Craftsman garage door opener includes a wireless keypad, you can program it to open the garage door using a personal code.

  1. Press and release the “Learn” button on the motor unit. The indicator light will turn on and stay on for 30 seconds.
  2. Within 30 seconds, enter your desired four-digit PIN on the keypad.
  3. Press and hold the “Enter” button on the keypad until the motor unit’s light blinks or you hear a click. This indicates that the keypad has been successfully programmed.
  4. Release the “Enter” button.

You can now use the keypad to open and close the garage door by entering your PIN and pressing “Enter.”


Step 5: Test the Garage Door Opener


After programming the remote control and keypad, it’s important to test the garage door opener to ensure everything is working correctly.

  1. Stand at a safe distance from the garage door.
  2. Press the programmed button on your remote control or enter your PIN on the keypad and press “Enter.”
  3. Observe the garage door’s operation. It should open or close smoothly without any issues.

If the door doesn’t respond as expected, repeat the programming steps to ensure the remote and keypad are correctly synced with the opener.


Troubleshooting Common Issues


While programming a Craftsman garage door opener is usually straightforward, you may encounter some common issues. Here are a few troubleshooting tips:


1. Remote Control Not Working: If your remote control isn’t working after programming, check the battery. A weak or dead battery can prevent the remote from sending a signal to the motor unit.

2. Keypad Not Responding: If the keypad isn’t responding, ensure that you entered the correct PIN during programming. You may need to reset the keypad and try programming it again.

3. Opener Light Not Flashing: If the opener’s light doesn’t flash during programming, ensure you’re pressing the correct button on the remote or keypad. Double-check the steps and try again.

4. Memory Issues: If you’re having trouble programming multiple devices, try clearing the opener’s memory and starting fresh. This can help eliminate any conflicting codes.


Final Thoughts:


Programming a Craftsman garage door opener is a simple process that enhances the convenience and security of your home. By following the steps outlined in this guide, you can program your remote controls and keypad with confidence. Regular testing and occasional reprogramming will ensure that your garage door opener continues to operate smoothly and reliably.


Remember to consult your Craftsman garage door opener’s manual for model-specific instructions and safety information. With proper programming and maintenance, your Craftsman garage door opener will provide years of dependable service.

You might also like

Fix N Go Blog

How to Replace a Garage Door Motor?
By Rabia Tingat July 24, 2025
If your garage door opener motor has become noisy, sluggish, or completely non-functional, it may be time to replace it. A faulty motor can make daily garage use frustrating and even unsafe. Fortunately, replacing a garage door motor isn't as complicated as it may seem—especially if you're comfortable with basic DIY tasks. In this step-by-step guide, we’ll walk you through how to replace a garage door motor safely and effectively. Whether you’re dealing with a burnt-out motor or simply upgrading to a newer model, we’ll help you understand the entire process—from removal to reinstallation. Signs Your Garage Door Motor Needs Replacing Before we jump into the replacement process, let’s look at a few signs that indicate your garage door motor is failing: The opener struggles to lift or lower the door Unusual grinding or humming noises from the motor Frequent power failures or overheating The door only opens partially or not at all The remote and wall switch stop responding If your opener exhibits any of these issues even after resetting or troubleshooting, replacing the motor is likely the best long-term solution. Choosing the Right Garage Door Motor Replacement Garage door motors (often called garage door openers) come in several types—chain drive, belt drive, screw drive, and direct drive. When choosing a replacement, make sure it’s compatible with: Your garage door's weight and size Available power source (AC or DC motor) Existing hardware and mounting setup Brands like Chamberlain, Genie, and LiftMaster offer reliable units that include all necessary mounting brackets, sensors, and manuals for a smoother installation. Tools You’ll Need Before replacing your garage door motor, gather these essential tools: Ladder Socket set Screwdrivers Adjustable wrench Wire cutters and strippers Power drill Safety glasses and gloves Once you're equipped, turn off the power supply to the opener to avoid electrical hazards. Step-by-Step Guide to Replacing a Garage Door Motor Step 1: Disconnect Power and Unplug the Motor Safety first—disconnect the opener from the power outlet. If it's hardwired into your home’s electrical system, turn off the circuit breaker. Confirm there's no electricity flowing to the unit using a voltage tester. Step 2: Disengage the Door from the Opener Pull the emergency release cord (usually a red handle) to disengage the garage door from the opener. This lets you open and close the door manually during the motor replacement process. Step 3: Remove the Old Garage Door Motor Start by detaching the wires connected to the safety sensors and wall switch. Take photos or label wires for reference during reinstallation. Next, use a socket wrench or screwdriver to unscrew the motor unit from its mounting bracket on the ceiling. Be cautious—these units are heavy and often require a second person to safely lower them. Once the motor is removed, also uninstall the rail and trolley if your new opener comes with its own. Step 4: Install the New Motor and Mounting Rail Assemble the new motor unit according to the manufacturer’s instructions. This often includes connecting the rail, carriage, and pulley system. Mount the new rail above your garage door and secure the motor to the ceiling using provided brackets. Make sure everything is level and firmly attached. A misaligned rail can lead to jerky movements or early wear on the new motor. Step 5: Wire the Motor and Accessories Reconnect the wall switch and safety sensor wires to the terminals on the new motor unit. Most openers have labeled terminals—typically for red, white, and black wires. If your model includes a backup battery, antenna, or Wi-Fi connection, set these up now. Follow your motor’s wiring diagram precisely to avoid connectivity issues. Step 6: Reconnect the Door and Adjust Settings Pull the emergency cord back into the “engaged” position to reattach the door to the trolley. Now, plug the motor into the power outlet or restore power at the breaker. Turn on the unit and test the door’s operation. Adjust the travel limits and force settings as needed. These settings ensure the door opens and closes completely without excessive strain. Refer to your manual for step-by-step adjustment instructions—usually involving small dials or digital buttons on the unit. Testing Your New Garage Door Motor Once installed, test the full functionality of the opener: Use both the wall switch and remote control Check safety sensors by blocking the beam—door should reverse Confirm smooth and quiet operation Listen for any abnormal noises or vibrations If the door doesn’t operate properly, recheck the alignment of the rail, the wiring connections, or the motor’s mounting hardware. Professional Help vs. DIY While replacing a garage door motor is a doable task for experienced DIYers, you may want to call a professional if:  Your opener is hardwired (no plug-in cord) The ceiling mount is in a tight or high area The garage door is unusually heavy or custom-built You’re unsure about wiring and adjustments Professional installers can typically complete the job within 1–2 hours, and many offer warranties on both labor and parts. Final Thoughts Replacing a garage door motor may seem like a big task, but with the right preparation and safety steps, it's well within reach for the average homeowner. Whether you're upgrading to a quieter, smarter opener or fixing a worn-out unit, understanding the wiring, mounting, and setup process will ensure a successful installation. Remember to always follow the manufacturer’s instructions, double-check your wiring, and test your new unit thoroughly. When done correctly, a new garage door motor will provide smooth, reliable performance for years to come.
How Does Genie Garage Door Motor Wire In?
By Rabia Tingat July 22, 2025
Find out how to wire a Genie garage door motor with expert tips. Improve motor performance and ensure secure, safe installation with this guide.
How to Replace a Garage Door Cable?
By Rabia Tingat July 20, 2025
Learn how to replace a garage door cable step-by-step. This guide covers tools, safety tips, and expert advice for a smooth and safe cable replacement.