How to Set Travel Limits on a Craftsman Garage Door Opener
If your garage door doesn’t open all the way or refuses to close properly, the issue often comes down to one thing: travel limits. Setting the Craftsman garage door travel limits correctly ensures smooth operation, better safety, and longer lifespan of your opener.
The good news? You don’t need to be a professional to fix this. With a few simple steps, you can adjust your opener and get your garage door working perfectly again. Let’s walk through everything you need to know in a clear and practical way.
What Are Travel Limits on a Garage Door Opener?
Travel limits control how far your garage door moves when opening and closing.
- Up limit → how far the door opens
- Down limit → how far the door closes
If these limits are not set correctly:
- The door may stop before fully opening
- It might reverse before touching the ground
- Or it could slam shut too hard
That’s why adjusting garage door opener limits is essential for both performance and safety.
Signs You Need to Adjust Travel Limits
Before you start, confirm whether travel limits are actually the problem. Here are common signs:
- Door doesn’t fully open: The door stops halfway or leaves a gap at the top.
- The door won’t close completely: It touches the ground and reverses or leaves a small opening.
- Door reverses suddenly: Even without obstruction, it goes back up.
- Grinding or straining noise: The motor struggles because limits are set incorrectly.
If you notice any of these, it’s time to adjust your Craftsman opener settings.
Tools You’ll Need
You don’t need much for this task:
- A ladder
- A screwdriver (usually flathead)
- Your Craftsman garage door opener
That’s it—simple and quick.
Step-by-Step Guide to Set Travel Limits
Follow these steps carefully to adjust your garage door travel adjustment settings.
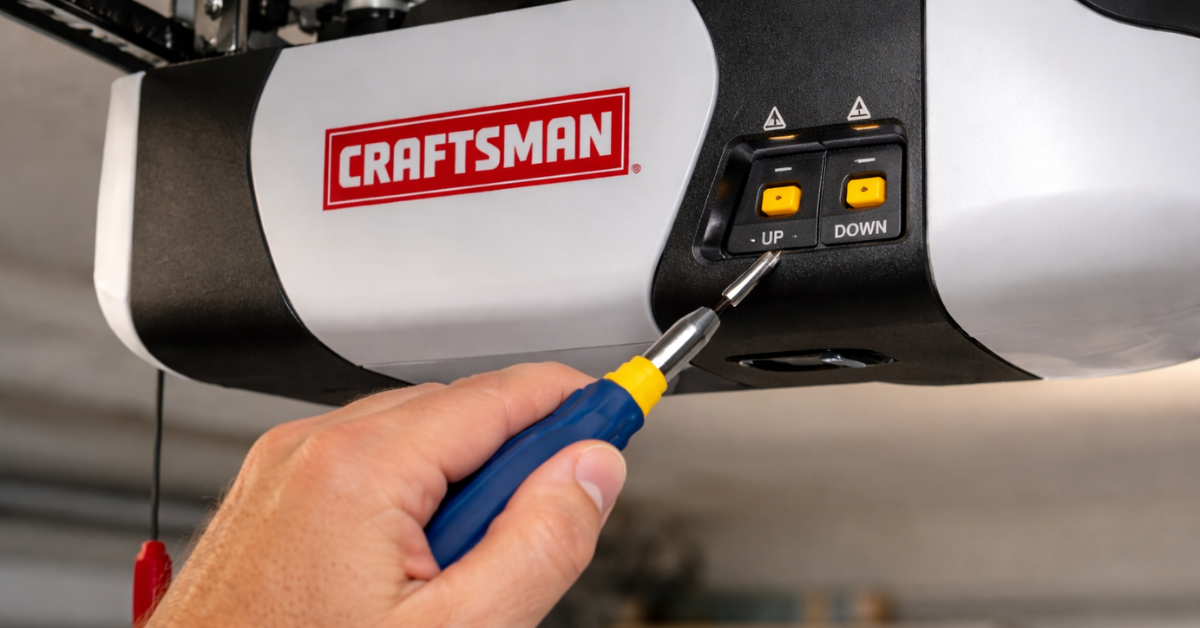
Step 1: Locate the Limit Adjustment Screws
First, find the adjustment screws on your opener unit.
They are usually:
- On the side or back of the motor housing
- Labeled as:
- UP / OPEN
- DOWN / CLOSE
These screws control how far your door travels.
Step 2: Test the Current Settings
Before making changes, run your garage door:
- Press the remote or wall button
- Observe how it opens and closes
Ask yourself:
- Does it stop too early?
- Does it hit the ground too hard?
This helps you know which direction to adjust.
Step 3: Adjust the Up (Open) Limit
If your door doesn’t open fully:
- Turn the UP screw clockwise to increase travel
- Turn it counterclockwise to reduce travel
Make small adjustments—about a quarter turn at a time.
Then test again.
Step 4: Adjust the Down (Close) Limit
If your garage door is not closing properly:
- Turn the DOWN screw clockwise to increase closing distance
- Turn it counterclockwise to reduce it
Again, adjust slowly and test after each change.
Step 5: Test Multiple Times
After adjustments:
- Open and close the door 3–4 times
- Watch for smooth operation
Ensure:
- The door fully opens without stopping
- It gently touches the ground without slamming
- It doesn’t reverse unexpectedly
Safety Tips You Should Not Ignore
While adjusting travel limits is simple, safety always comes first.
- Keep hands clear: Never place your hands near moving parts.
- Disconnect power if needed: If unsure, unplug the opener before adjusting.
- Check sensors: Misaligned sensors can also cause closing issues.
- Don’t over-adjust: Too much adjustment can damage the opener or door.
Common Mistakes to Avoid
Many beginners make small errors that cause bigger problems later.
- Turning screws too much at once. Always adjust gradually.
- Ignoring sensor issues. Sometimes the issue isn’t the limits—it’s the sensors.
- Skipping testing. Always test after each adjustment.
- Forcing the door manually. This can damage the motor or track system.
When Travel Limits Aren’t the Problem
If adjusting limits doesn’t fix the issue, consider these possibilities:
- Faulty safety sensors
- Worn-out springs
- Track misalignment
- Motor issues
In such cases, it’s better to consult a technician.
Benefits of Proper Travel Limit Settings
Once you correctly set your Craftsman garage door travel limits, you’ll notice immediate improvements:
- ✔ Smooth opening and closing
- ✔ Reduced strain on the motor
- ✔ Longer lifespan of the opener
- ✔ Improved safety
- ✔ Better energy efficiency
It’s a small adjustment that makes a big difference.
Final Thoughts
Setting Craftsman garage door travel limits might sound technical, but it’s actually a simple DIY task. With a screwdriver and a few minutes, you can fix common garage door issues without calling a professional.
The key is patience—make small adjustments, test frequently, and focus on smooth operation.
Once done correctly, your garage door will function like new again.
FAQs
Q1. How do I know if my travel limits are wrong?
A: If your garage door doesn’t fully open or close, or reverses unexpectedly, your travel limits likely need adjustment.
Q2. Can I adjust Craftsman garage door limits myself?
A: Yes, it’s a simple DIY task. You only need a screwdriver and basic guidance.
Q3. Why does my garage door reverse before closing?
A: This usually happens due to incorrect down limit settings or sensor issues.
Q4. How often should I check travel limits?
A: Check them once or twice a year, especially if you notice unusual door behavior.
Q5. What if adjusting limits doesn’t fix the problem?
A: Then the issue may be with sensors, springs, or the motor. In that case, consider professional help.
You might also like
Fix N Go Blog