
How Can You Maximize the Lifespan of Your Garage Door Track?
A garage door track may seem like a minor component in the grand scheme of a home, but its significance cannot be overstated. It plays a crucial role in the smooth operation of your garage door, providing the necessary guidance for the door's movement. Understanding the importance of the garage door track and taking measures to maximize its lifespan are essential for ensuring the overall functionality and security of your garage.
The garage door track serves as the pathway that facilitates the movement of the garage door along its designated path. This seemingly simple metal structure is responsible for guiding the door as it opens and closes, ensuring a smooth and efficient operation. The track system consists of various components working in tandem, including rollers, hinges, and brackets, all contributing to the seamless functionality of the garage door.
Beyond its mechanical function, the garage door track also contributes to the
security of your home. A well-maintained track ensures that the door closes securely, preventing unauthorized access and safeguarding your valuable belongings stored in the garage. Neglecting the condition of the garage door track can lead to operational issues, security vulnerabilities, and potentially costly repairs.
What You Need to Know About Garage Door Tracks
The operation of a garage door track is a marvel of simplicity and precision. At its core, a garage door track functions as a guide for the door's movement, allowing it to open and close smoothly. The track system typically consists of two parallel tracks, one on each side of the door, guiding the movement of the door panels. Attached to the bottom of the garage door are rollers, which glide along the tracks as the door is operated.
The garage door track operates on a straightforward principle of alignment and movement. When the door is in motion, the rollers smoothly traverse the track, guiding the door up and down. The hinges connecting the door panels facilitate their smooth articulation, ensuring a fluid and coordinated movement. The role of the track is not only to guide but also to support the weight of the door, distributing the load evenly for efficient operation.
Understanding these basic mechanics is crucial for homeowners, as it lays the foundation for recognizing potential issues and performing effective maintenance. A misaligned track, damaged rollers, or issues with the hinges can disrupt this harmony, leading to operational problems that may compromise the functionality of the garage door.
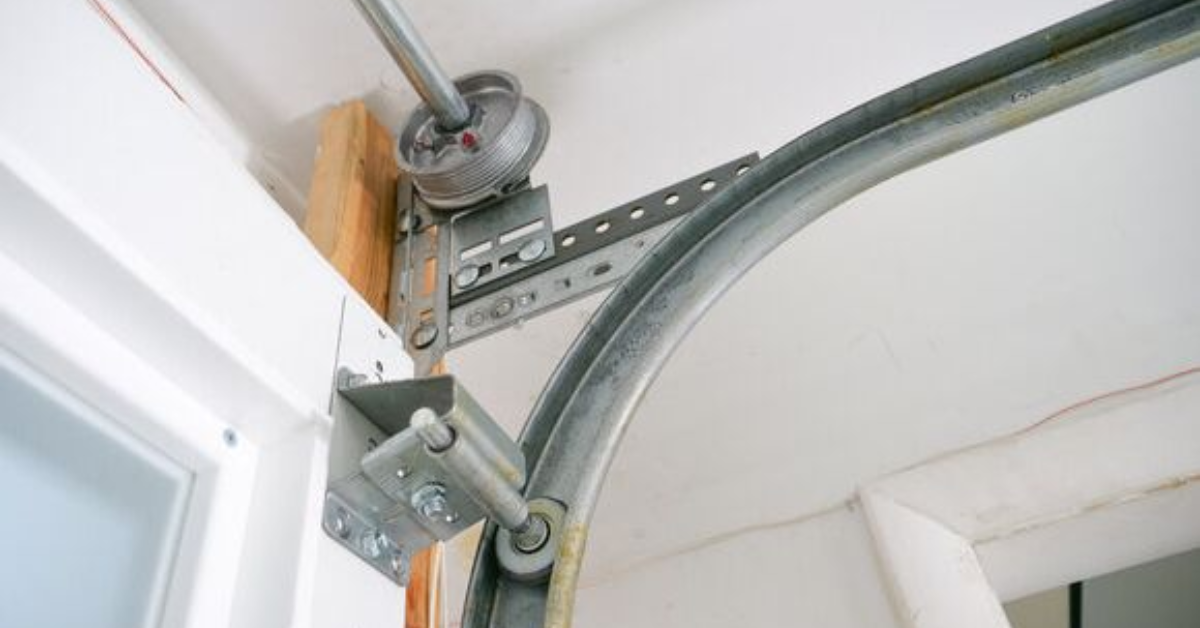
Components of a Garage Door Track System
A garage door track system comprises several essential components working together to ensure the proper functioning of the door. These components include:
Tracks: The primary guide rails, usually made of durable metal, that are mounted on the sides of the garage door opening. They provide the pathway for the rollers to move as the door opens and closes.
Rollers: Attached to the bottom of the garage door, these cylindrical components rotate within the tracks, allowing the door to move smoothly along its path.
Rollers come in various materials, such as nylon, steel, or plastic.
Hinges: The points of articulation between individual door panels. Hinges allow the door to bend and follow the curvature of the tracks during its movement.
Brackets:
Securely attach the tracks to the garage ceiling. Properly installed brackets are crucial for maintaining the stability and alignment of the entire track system.
Springs and Cables:
In some garage door systems,
torsion or extension springs work in conjunction with cables to counterbalance the weight of the door, assisting in its smooth movement.
Understanding how these components interact is vital for troubleshooting and maintenance. Regular inspection of these elements can help identify issues before they escalate, ensuring a longer lifespan for the garage door track system.
Factors Affecting the Lifespan
Environmental Factors (e.g., Weather, Climate)
The garage door track is exposed to the elements, making it susceptible to weather-related wear and tear. Harsh climates, extreme temperatures, and exposure to moisture can lead to rust, corrosion, and degradation of the track's materials. Regular inspection and protective measures, such as applying weather-resistant coatings, can mitigate the impact of environmental factors on the lifespan of the garage door track.
Frequency of Use:
The more frequently a garage door is operated, the greater the stress on its track system. Daily use, especially in high-traffic households, can accelerate wear and tear. Regular maintenance becomes crucial in such cases to address issues promptly and prevent premature failure. Lubrication and periodic inspections are essential to ensure the smooth operation of the garage door track under regular use.
Quality of Materials:
The longevity of a garage door track is significantly influenced by the quality of materials used in its construction. High-quality metals, such as galvanized steel or aluminum, resist corrosion and provide durability. Additionally, durable rollers and hinges made from quality materials contribute to the overall robustness of the track system. Investing in a well-constructed garage door track from the outset can pay dividends in terms of extended lifespan and reduced maintenance requirements.
Regular Maintenance Practices
Regular maintenance is essential for ensuring the longevity and optimal performance of your garage door track. By incorporating a few simple practices into your routine, you can address potential issues before they escalate.
Regular inspections are the cornerstone of proactive maintenance. Conduct visual checks on the garage door track, rollers, hinges, and brackets. Look for signs of wear, misalignment, or damage. Pay attention to any unusual sounds during door operation, as these can be indicative of underlying issues. Check for loose bolts, dents in the tracks, or any obstructions that might impede smooth movement.
Dirt, debris, and accumulated grime can hinder the smooth operation of the garage door track. Regularly clean the tracks with a soft brush or cloth to remove any particles. Lubricate moving parts, including rollers, hinges, and springs, using a silicone-based or lithium-based lubricant. Ensure that the lubrication reaches all crucial points to minimize friction and reduce wear.
Vibrations from the constant movement of the garage door can lead to the loosening of bolts and brackets. Periodically check and tighten any loose components, including bolts securing the tracks and brackets. Ensure that all parts of the track system are securely fastened to maintain proper alignment and stability.
Addressing Common Issues Early
Detection of Alignment Problems:
A misaligned garage door track can lead to uneven door movement and premature wear on components. Regularly check the alignment by visually inspecting the tracks. If you notice any deviations or gaps between the rollers and the tracks, address them promptly. Misalignment issues are often manageable through simple adjustments, preventing further complications.
Dealing with Lubrication Issues:
Inadequate or dried-out lubrication can result in increased friction and wear on moving parts. If you observe resistance during door operation or hear squeaking sounds, it's a sign that lubrication is needed. Apply a suitable lubricant to all moving parts, including rollers, hinges, and springs, following the manufacturer's recommendations. Regular lubrication not only ensures smooth operation but also protects against corrosion.
Preventing Rust and Corrosion:
The garage door track is exposed to environmental elements, making it susceptible to rust and corrosion, especially in humid or coastal areas. Apply a rust-resistant coating to the tracks to provide a protective barrier against moisture. Regularly inspect for any signs of corrosion and address them promptly by cleaning and applying anti-corrosion solutions. This proactive approach helps maintain the structural integrity of the track system and extends its lifespan.
Upgrading Your Garage Door Track
Explore modern track options to enhance the performance and longevity of your garage door. Consider tracks made from high-grade materials like galvanized steel or aluminum, providing increased durability and resistance to rust and corrosion. Upgrading to roller systems with nylon or polymer rollers minimizes friction and noise during door operation. Some modern tracks feature multi-layered construction, reducing the risk of warping or bending over time. Additionally, opt for tracks with advanced corrosion-resistant coatings, offering superior protection against environmental elements and extending the overall lifespan of the track system.
Benefits of Upgrading for Longevity
Investing in modern tracks for your garage door not only extends their lifespan but also enhances overall performance. These tracks, thoughtfully designed for longevity, reduce the need for frequent replacements and repairs. The upgrade to a modern track system ensures smoother door operation, minimizing wear and tear on other components. Moreover, these tracks, equipped with advanced materials and coatings, offer enhanced resistance to environmental factors, ensuring a more robust and reliable performance over time. As an added benefit, the reduced maintenance requirements of upgraded tracks translate to significant time and cost savings in the long run.
Knowing When to Call a Professional
- If repairs involve complex components like springs, cables, or the motor, it's advisable to seek professional assistance.
- If there are safety concerns, such as issues with the garage door's balance or tension, professional technicians are equipped to address them safely.
- If DIY attempts do not resolve the issue or if problems persist, it's a sign to involve a professional who can conduct a thorough assessment.
DIY Safety Precautions:
- Before any DIY repairs, disconnect the power to the garage door opener to prevent accidental activation.
- Ensure the garage door is securely propped open or locked in place to prevent unexpected closing during repairs.
- Wear safety glasses and gloves to protect against potential hazards.
- Adhere strictly to manufacturer guidelines and instructions for DIY repairs.
- If a repair seems beyond your skill level or involves significant risk, it's safer to call in a professional to avoid injury or further damage.
Balancing DIY efforts with professional expertise is key to effective garage door maintenance. While some upgrades and minor repairs can be tackled independently, recognizing the limits of DIY and knowing when to involve a professional ensures the safety and optimal functionality of your garage door system.
Extending Lifespan with Best Practices
Incorporating seasonal maintenance practices is crucial for extending the lifespan of your garage door system. Each season brings unique challenges that can impact the performance of the tracks and other components.
During the spring, a comprehensive inspection is recommended. This entails checking the entire garage door system for signs of wear, misalignment, or damage. Focus on the tracks, rollers, hinges, and any other moving parts. Identifying and addressing issues in the spring sets the foundation for smooth and reliable operation throughout the year.
As summer temperatures rise, it's an opportune time to prioritize lubrication. Applying a high-quality lubricant to moving parts such as rollers, hinges, and springs is essential. This minimizes friction, reduces wear, and ensures that the garage door operates smoothly. Proper lubrication is a simple yet effective measure to enhance the longevity of the entire track system.
Fall brings the need for debris removal. Leaves, dirt, and other debris can accumulate in the tracks, affecting the garage door's movement. Regularly clean the tracks and surrounding areas to prevent obstructions. This proactive step not only maintains optimal functionality but also prevents premature wear and tear caused by debris-related issues.
As winter sets in, consider insulation measures. Cold temperatures can affect the performance of the garage door, especially in regions prone to freezing conditions. Insulating the tracks and other components helps maintain consistent operation, protecting against weather-related stress and potential damage.
Conclusion
The durability and efficiency of your garage door track rely on proactive maintenance. We've highlighted the importance of grasping track basics, factors affecting lifespan, and the advantages of DIY and professional services. Regular inspections, thorough cleaning, and early issue resolution are vital. Upgrading to modern tracks and adhering to best practices, especially considering seasonal variations, further boost overall durability. To summarize, a well-maintained garage door track not only ensures daily smooth operations but also enhances the security and functionality of the entire system. Prioritizing these practices allows homeowners to maximize track lifespan, underlining the crucial role of proactive maintenance in ensuring a reliable and enduring investment.
You might also like
Fix N Go Blog


